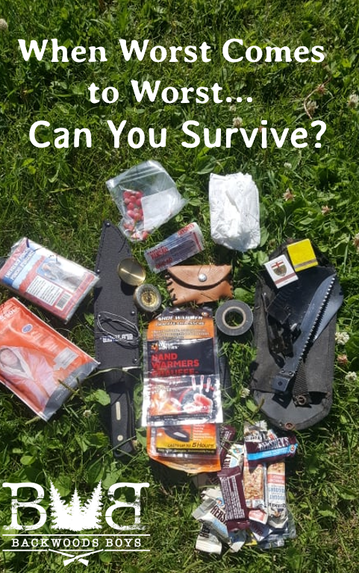
A good survival kit is a tricky thing to build. Partly because you’re putting something together that, ideally, you never want to actually use. And besides, how are we supposed to pack everything we might need in an emergency when we can’t even remember to pack everything we need for a weekend of camping?
Those are both legitimate points. It can be intimidating to build a kit that, if incomplete, could result in a slow, lonely death. And it can be equally unmotivating to build that pack when, chances are, you’ll never need it anyway.
Well, we’re here to help with that. The best way to know what to pack for an emergency is to get some advice from someone who has been in such an emergency and actually needed a survival kit. And the best motivation for building a survival kit that you’ll hopefully never use is to get some advice from someone who has been in such an emergency and actually needed their survival kit. That’s where we come in. We can offer some insight into the things you’ll want in your pack, should you ever need to use it.
*Disclaimer: This is general advice only. The first thing to remember about building a survival kit is to take into consideration the situations you stand to get into. Those emergencies are as variable as the geography in which they can occur. So a survival kit built for northern Saskatchewan will likely not be identical to one built for survival in Grasslands national Park, or the Rocky Mountains.*
So, as I just mentioned, the first step is to think “what is the worst-case scenario that I stand to get myself into?”
Are you hiking through the foothills of Alberta in July? Or snowmobiling across a frozen bog in northern Saskatchewan in January? For one of these, a small bottle of high-concentration bug-spray may be one of the most important items in your pack. In the other case, it might be considerably less useful. In both, however, a small magnetic compass is a must-have.
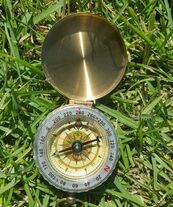 A magnetic compass should be the foundation of every survival kit
1) Magnetic Compass
The cornerstone of every wilderness survival kit should be a compass. Your chances of survival are greatly diminished if you are walking farther from safety because you don’t know where you are.
The cornerstone of every wilderness survival kit should be a compass. Your chances of survival are greatly diminished if you are walking farther from safety because you don’t know where you are.
|
2) Area Map
Now along with that compass, a map of the area is also often a useful item. Maps fold down nice and small, and it is sure helpful to be able to find your way into a clearing or to a riverbank, check your map to see where you are, then use your compass to find your way home from there. Now, obviously a map isn’t always a realistic thing to have along—depending on the circumstances you may or may not have one available to you. On the other hand, for your favourite hunting area, or in our case, our trapline, finding an area-specific map is a little more feasible. A good map of the area can also help you identify useful features in the surrounding geography like ridges that you may be able to climb and get a good view (or cell service) from, water for drinking, or the always-important-but-hard-to-find: Bacon Tree! |
The elusive Bacon Tree
|
 Fire-starting supplies are the second-most important part of a survival pack
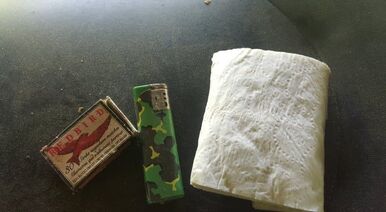
3) Matches/Lighter/Toilet Paper
Now, while the map isn’t necessarily a realistic option for every pack, fire-starting equipment absolutely is. The only reason I’m listing it after the map is because the map is paired with the compass.
Every survival kit, summer and winter alike, needs to give you the ability to build a fire. A fire can keep you from freezing, help you cook food/boil water, create a smudge to keep bugs away, keep animals away at night, and create a signal for emergency crews to spot.
A lighter is handy because it doesn’t stop working when wet. It can, however, malfunction or break, or inadvertently drain all the butane/lighter fluid if positioned poorly in the pack.
Matches, on the other hand, are useless when wet, but won’t malfunction as long as they are dry. Pack them in a ziplock bag or a small, water-proof container along with your lighter. Rain or shine, you should be set for building a fire.
Add a roll (or at least a good-sized wad) of toilet paper to the same bag/container. Besides the obvious use (spruce boughs are extremely uncomfortable, especially if mistakenly pulled through against-the-grain), it makes great kindling for starting your fire. Just crumple up a square or two, position it under small twigs covered in old-man’s-beard moss, and you should be in business.
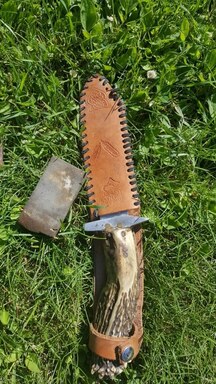 A good knife is an outdoorsman's best friend. But if it isn't sharp, it isn't a very useful friend. (Just like real friends...?)
4) Knife/Whetstone
Another crucial component of any survival kit is a knife. A good multi-tool with pliers, knife, saw, screwdriver etc. is a good choice, but so is a hunting knife. In our case, we carry both—a multi-tool in a sheathe on the belt, and a hunting knife in the survival pack.
A good knife is important for protection, prepping food, cutting kindling, and countless other uses. A small whetstone is also a good idea. If your knife is a survival-specific one and comes with a whetstone in the sheathe, all the better.
|
5) First Aid Kit
A simple first aid kit, with Band-Aids, gauze, polysporin, and Tylenol should always be a part of a good survival pack. It packs down small and can highly increase your chances of survival in case of injury. It’s very hard to survive when you’re bleeding out along the way. |
Even flesh wounds can be dangerous if not treated properly!
|
6) Parachute Cord
Parachute cord can be used for a variety of things like… tying stuff, or securing things, or lashing items together.
Seriously though, it can be used to hang food out of reach of bears, tie together a shelter, snare rabbits, or any number of other things. For the minuscule amount of space it takes up in your pack, it’s definitely worth having a few feet of this along with you.
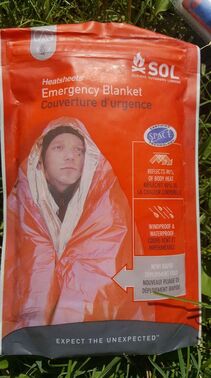 A space blanket folds down into a small pack that is easy to carry in any survival kit
7) Space Blanket
Now this blanket is a special addition for only the most remote of survival situations—those in which you are lost in space.
Ok, not really. Most of you have probably seen them in Cabela’s or other similar stores, called space blankets, thermal blankets, mylar blankets, or emergency blankets. They fold down into a small package the size of a plastic rain poncho. One side is generally blaze orange, while the other is flashy silver. It’s small, and it’s cheap, and it’s incredibly useful when you need to keep warm.
The thin aluminum layer reflects infrared energy or, in other words, thermal energy. This makes the space blanket useful in a variety of ways. If you have no access to a heat source (because you chose to ignore the section of this guide where we outlined the importance of matches and a lighter, or for any other reason), you can simply wrap yourself in the blanket, reflective side facing your body. As the heat leaves your body, rather than dissipating into the air, much of it (about 80%) will be redirected back towards yourself.
Similarly, if you build a one-sided lean-to, with the fire facing the open side, you can line the inside of the lean-to with the blanket, shiny-side facing down. Just like the first example, as the heat from the fire enters the lean-to, rather than simply hitting the far wall and escaping into the air, it instead meets the foil-like surface of the blanket and is reflected back and downwards, ideally, directly onto you as you lie in the shelter.
Conversely, it can also be used to keep you cool in the summer. Wearing it over your body with the foil facing the sky, or building a shelter with it (again, with the foil facing the sky), will reflect the sun’s heat away from you.
Just make sure you don’t get the instructions mixed up and wrap up in it, foil-side out, by the fire in the winter. That will just reflect the heat away from your body and help you freeze faster. Unless that’s what you want. You do you!
Finally, the shininess of the foil-side can be used to signal for help. When someone is lost, emergency teams tend to fly around the area in which the person is believed to be. Having done an emergency fly-over in search of a missing hunter, I can assure you that it is very difficult to see anything on the forest floor from the air. Even if you think you are clearly visible, chances are, you are significantly less-visible to anyone flying over. A reflective blanket flashing in the sun stands out far better to the aerial search party than just one more dark object hundreds of feet below the aircraft.
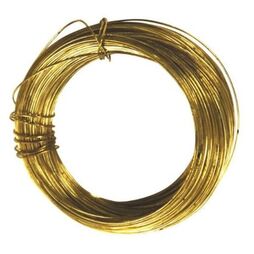 Rabbit snare wire like this is great for capturing small game
8) Length of Wire
A strand of wire can be extremely useful in the right situation. Specifically, a small roll of brass-coloured rabbit-snare wire. These rolls normally have 10-20 feet of thin wire, but take up almost no space and add very little weight. This wire is far more efficient than parachute cord for snaring small game, and can also be used to hang a pot over a fire for cooking. Which leads me to the next point.
A strand of wire can be extremely useful in the right situation. Specifically, a small roll of brass-coloured rabbit-snare wire. These rolls normally have 10-20 feet of thin wire, but take up almost no space and add very little weight. This wire is far more efficient than parachute cord for snaring small game, and can also be used to hang a pot over a fire for cooking. Which leads me to the next point.
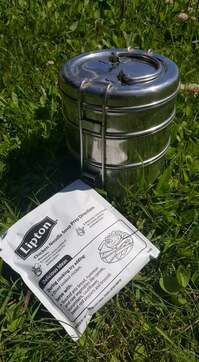 A tin can can keep your dry stuff dry, and provide a useful container for cooking
9) Small Tin Container, Preferably With Handle
This doesn’t have to be very big and can double as the waterproof container in which you keep your fire-starting equipment. Having such a container allows you to melt snow for water, boil water for drinking, make tea, or cook food. Along with your matches, consider throwing in some tea bags or hot chocolate mix as well. The hot chocolate mix is good for extra energy, and tea will give you a temporary boost if you haven’t been able to find food yet. Neither the tin can nor the tea/chocolate mix weigh very much, and they can be literal life-savers in a winter emergency.
This doesn’t have to be very big and can double as the waterproof container in which you keep your fire-starting equipment. Having such a container allows you to melt snow for water, boil water for drinking, make tea, or cook food. Along with your matches, consider throwing in some tea bags or hot chocolate mix as well. The hot chocolate mix is good for extra energy, and tea will give you a temporary boost if you haven’t been able to find food yet. Neither the tin can nor the tea/chocolate mix weigh very much, and they can be literal life-savers in a winter emergency.
10) Chicken Noodle Soup Mix
Keep a few packs of dehydrated chicken noodle soup mix with your dry supplies. Again, these packages weigh almost nothing, and provide a nice easy meal or two while you wait for rescue or try to find more food.
Keep a few packs of dehydrated chicken noodle soup mix with your dry supplies. Again, these packages weigh almost nothing, and provide a nice easy meal or two while you wait for rescue or try to find more food.
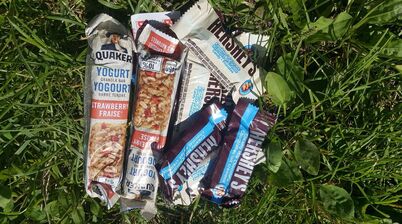 High-energy emergency food can keep you going until you reach safety or find a food source
11) High-Energy Food
Chances are, if you’re stuck trying to set up shelter, find water, and start a fire, you won’t get a chance to scavenge around for food right away. Make sure you have some high-energy, non-perishable food in your pack. Obviously the lighter the better, since you don’t want to be lugging a bunch of weight around in your pack that you hopefully will never use. Mini chocolate bars, jerky/pemmican, and granola bars are good options. We generally keep a selection of each of these in our pack.
Plus, carrying a few mini chocolate bars around increases the likelihood of you getting some use out of your survival pack, even in a non-emergency situation. Just make sure to restock before heading back into the field next time.
12) Mirror
A small makeup mirror can serve as another method of attracting attention of an aerial search-team. Flashing the mirror in the sun can draw the eye of the emergency team to your location and help them see what they otherwise might have simply flown over. This item is of less concern, however, if you already have a space blanket or fire with which to signal.
A small makeup mirror can serve as another method of attracting attention of an aerial search-team. Flashing the mirror in the sun can draw the eye of the emergency team to your location and help them see what they otherwise might have simply flown over. This item is of less concern, however, if you already have a space blanket or fire with which to signal.
Vehicle-Specific Supplies
This last section deals specifically with extra items to carry if you are travelling by vehicle (specifically atv or snowmobile) rather than on foot. Although the previous items are all crucial components of your survival pack, even if travelling by vehicle, adding a few of these items can help ensure that you make it back to safety without even having to break into your regular survival kit.
This last section deals specifically with extra items to carry if you are travelling by vehicle (specifically atv or snowmobile) rather than on foot. Although the previous items are all crucial components of your survival pack, even if travelling by vehicle, adding a few of these items can help ensure that you make it back to safety without even having to break into your regular survival kit.
 Keep a set of tools with your vehicle at all times. Fixing a machine on the trail sure beats a 4-day walk home.
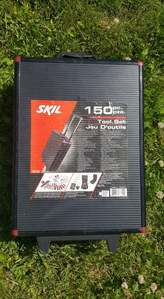
1) Tools
Carrying the tools necessary to do a trail fix is often all it takes to help you get home rather than spend a cold, lonely night in the wilderness. Often, a 10 mm, 14mm or 9/16th, and a sparkplug socket are all you really need, but if you have a vehicle, why not take the whole set? There’s not much more frustrating out in the bush than knowing exactly what is wrong and how to fix it, but not having the necessary tool with you.
Make sure that you have a socket that fits your sparkplug, especially if running a 2-stroke machine.
A set of needle nosed pliers also comes in handy when doing a trail-fix.
 An extra drive belt for your machine is easy to carry along and can get you out of some real pickles!
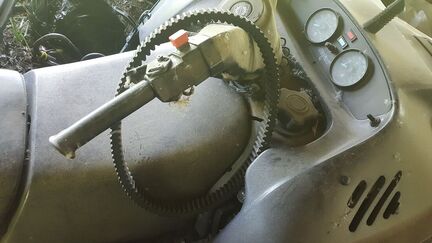
2) Extra Drive Belt
I can’t tell you how many times our snowmobile has broken down on the trail and would have left us stranded from home, days away from the cabin in -40 degree weather, if it weren’t for the extra drive belt we always carry under the seat or around the handlebars with us.
An extra drive belt can literally mean the difference between a life-or-death situation and a minor inconvenience.
3) Sparkplugs
Make sure to carry an extra set of sparkplugs with you, again, especially if using a 2-stroke machine. A fouled plug can shut a machine down and leave you hating yourself for not carrying an extra along.
Make sure to carry an extra set of sparkplugs with you, again, especially if using a 2-stroke machine. A fouled plug can shut a machine down and leave you hating yourself for not carrying an extra along.
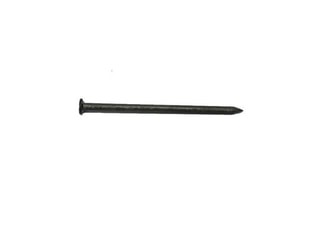 A simple iron nail can be used for surprising things on the trail
4) Small Headless Iron Nail
An iron nail isn’t something that most people would make sure to bring along, but it can honestly be a life saver. If your sparkplug cable breaks or burns in half (as we’ve experienced), you can connect the two halves of the sparkplug wire with the nail (just stick it into the broken ends of the cable, ensuring it makes contact with the wire inside), and wrap it up with electrical tape.
It’s not a permanent fix, but it can mean the difference between a days-long walk home or a half-hour trail fix.
5) Electrical Tape
A small roll of electrical tape can come in useful in a lot of scenarios, but especially in situations like stated above, when dealing with sparkplug cables.
A small roll of electrical tape can come in useful in a lot of scenarios, but especially in situations like stated above, when dealing with sparkplug cables.
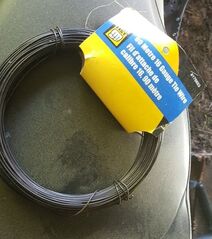 A spool of baler wire can get you out of a potentially nasty situation! Others have even used it to weave together a torn snowmobile track
6) Baler/Tie Wire
A little heavy and pointless to carry in your hiking pack, a coil of heavy-gauge baler (or tie) wire can be kept under the seat of your snowmobile or in a box on an ATV for a variety of fixes. Most notably, if you break a snowmobile ski (as we have), using two stout birch branches (or any species really) to splint the ski, then wrapping it up tight with the wire can keep you going until you get home. We actually drove for a couple weeks like this until we were able to get a new ski, and it worked surprisingly well!
A little heavy and pointless to carry in your hiking pack, a coil of heavy-gauge baler (or tie) wire can be kept under the seat of your snowmobile or in a box on an ATV for a variety of fixes. Most notably, if you break a snowmobile ski (as we have), using two stout birch branches (or any species really) to splint the ski, then wrapping it up tight with the wire can keep you going until you get home. We actually drove for a couple weeks like this until we were able to get a new ski, and it worked surprisingly well!
7) Tarp
Throw a new tarp (still in its space-saving packaging) in your sleigh or strap it to the back of your ATV/snowmobile. Not only does it make for an easy, water-proof shelter, it can help thaw out your machine if it begins freezing up. Just this last winter, I was far from civilization when my snowmobile, which had been ploughing several feet of fresh, fluffy snow all day, began to freeze up.
My snowmobile was suddenly almost completely powerless and wanted to stall whenever I eased up even slightly on the gas. I managed to limp it out of the fluff, then covered it with a tarp. The engine heat, trapped beneath the tarp, helped thaw things out to the point where I could get back to my truck and grab my bottle of gasline antifreeze. Which leads to the next point...
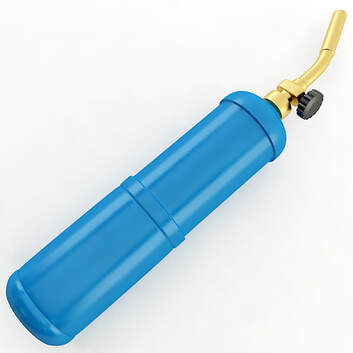
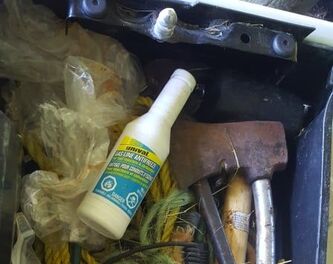 It's small, it's cheap, and it can be a literal life-saver on the trail. Always keep a bottle of gasline antifreeze with you!
8) Gasline Antifreeze
Honestly, in the above story, I should never have left the truck without gasline antifreeze. It comes in a tiny little bottle that easily fits under the seat of a snowmobile. Just toss it in and forget about it until you need it. It’s one of those things that I never thought about until my snowmobile started sputtering, and then I really wished I had it.
Honestly, in the above story, I should never have left the truck without gasline antifreeze. It comes in a tiny little bottle that easily fits under the seat of a snowmobile. Just toss it in and forget about it until you need it. It’s one of those things that I never thought about until my snowmobile started sputtering, and then I really wished I had it.
9) Axe/Bowsaw
If you have a vehicle, you probably have room to slip one or both of these in somewhere. If you do end up having to spend the night, they can sure make gathering wood a lot nicer. Alternatively, if your trail is blocked by a couple downed trees, it’s sure nice to be able to just cut them out, rather than double back where you came from.
If you have a vehicle, you probably have room to slip one or both of these in somewhere. If you do end up having to spend the night, they can sure make gathering wood a lot nicer. Alternatively, if your trail is blocked by a couple downed trees, it’s sure nice to be able to just cut them out, rather than double back where you came from.
 A small propane torch can help you get that life-saving fire going, or pop a tire back on a rim. Just hang on to your eyebrows when attempting the latter!
10) Small Propane Torch
Obviously, this is not realistic to carry in your hiking pack, and unless you have a sleigh/trailer, it isn’t even all that realistic to carry on a vehicle. However, having one of these along can be incredibly handy.
During the winter, a propane torch can help you light that emergency fire far easier than you can with a match and frozen fingers.
Outside of winter, when you are driving a wheeled vehicle, it can be used to pop a tire back onto the rim if it happens to pop off (generally from hitting an unseen stump along the trail). Along with this, keep a tire-plug kit and bicycle pump under the seat. This way if you puncture a tire, you can likely fix it and limp home.
If your punctured tire has popped off the rim (as they often do), then filling the inside of the tire with a little propane and lighting it can pop the tire back onto the rim. Quickly pump it up with the bicycle pump, and you’re good to go again!
*Disclaimer: This should only be done in extreme emergencies, and is dangerous to attempt. Preferably, don’t do this, and if you do, Backwoods Boys is not responsible for things going wrong. This is just one fix that has come in handy a handful of times on our trapline.
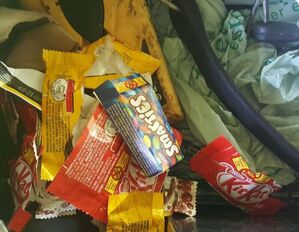 Apparently our under-the-seat chocolate bar stash needs some refreshing as well!
Final Tip: Don't die
If you just make sure that you don't die, you'll be ok.
This is not an exhaustive list; we are sure everyone can think of a few items that we didn't discuss, but that might be nice to have along in case of an emergency (hand-warmers, for instance). The point is though, that a good survival pack can mean the difference between well... survival, and a lonely, slow death in the wilderness. And although most people never have to use theirs, it is absolutely crucial to have a carefully thought-out survival kit along with you on the off-chance that things go wrong and you find yourself in a situation in which it is needed. There’s plenty of good bush-wisdom out there, but “it’s better to have it and not need it than to need it and not to have it” definitely sums things up when it comes to survival kits.
So before you head out into the wilderness next, take stock of the risks. What kind of weather might you be facing? What could go wrong while you’re out there? If worst comes to worst, what would help you get back to safety or, at very least, manage to survive until a rescue team finds you? Pack your survival kit, add to it as new items come to mind and above all, make sure to restock your mini chocolate bars after you eat them in a non-emergency situation.
Take care out there, and always stay Bush Smart.
TL;DR List of Survival Equipment
Personal Pack:
- Compass
- Map
- Matches/Lighter/Toilet Paper
- Knife/Whetstone
- First Aid Kit
- Parachute Cord
- Space Blanket
- Wire
- Tin Container
- Chicken Noodle Soup Mix
- High Energy, Non-Perishable Food
- Mirror
- Tools
- Drive Belt
- Sparkplugs
- Iron Nail
- Electrical Tape
- Baler Wire
- Tarp
- Gasline Antifreeze
- Axe/Bowsaw
- Propane Torch
 RSS Feed